Jumpserver新版本安装部署
#为什么要写这篇博文,截止于写这篇博文的时候,github上面的步骤并不是很详细,另外最气人的是网上复制粘贴的现象依旧很严重,纯粹的为增加博文的数量而写博客,搜索半天搜索不到有价值的东西。
#我这里的操作系统就是Centos7.4。
#特别注意写这篇博文的时候才是1.4.3,博文里面提到的两个问题在新版本v1.4.4上面已经解决了。安装Jumpserver最新版就按照官网走就行。
一、Jumpserver新版本介绍
1.1 架构说明
#新版本的jumpserver跟以前0.3系列的时候架构方向可是有很大的不一样。
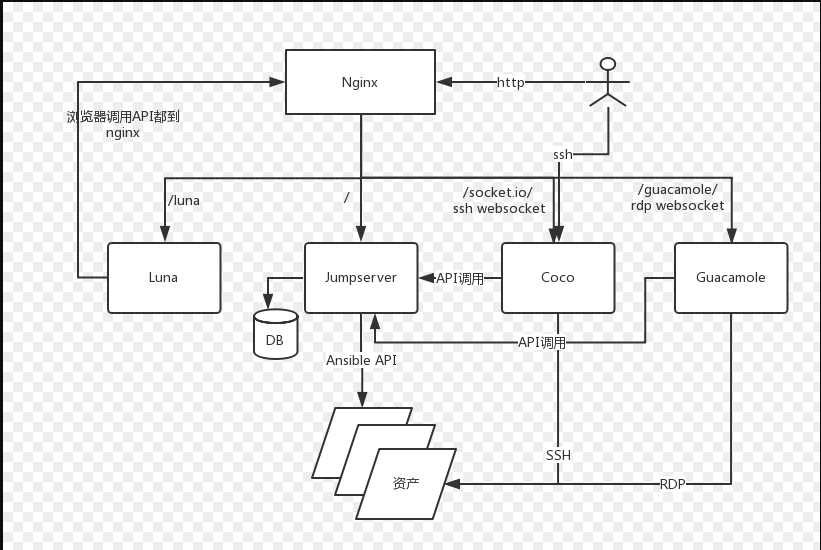
#此图来自官方github:http://docs.jumpserver.org/zh/docs/admin_instruction.html#jumpserver
#Jumpserver 采纳分布式架构,支持多机房跨区域部署,中心节点提供 API,各机房部署登录节点,可横向扩展、无并发访问限制。
1.2 组件说明
Jumpserver:现指 Jumpserver 管理后台,是核心组件(Core), 使用 Django Class Based View 风格开发,支持 Restful API。
Coco:实现了 SSH Server 和 Web Terminal Server 的组件,提供 SSH 和 WebSocket 接口, 使用 Paramiko 和 Flask 开发。
Luna:现在是 Web Terminal 前端,计划前端页面都由该项目提供,Jumpserver 只提供 API,不再负责后台渲染html等。
Guacamole:Apache 跳板机项目,Jumpserver 使用其组件实现 RDP 功能,Jumpserver 并没有修改其代码而是添加了额外的插件,支持 Jumpserver 调用。在这里的作用是采集Windows资产信息,如果不需要刻意不安装。
Jumpserver-Python-SDK:Coco 目前使用该 SDK 与 Jumpserver API 交互。
二、Jumpserver安装
1.1 环境设置
#关闭防火墙和selinux
修改字符集:
#修改字符集,否则可能报 input/output error的问题,因为日志里打印了中文
# localedef -c -f UTF-8 -i zh_CN zh_CN.UTF-8
# echo 'LANG="zh_CN.UTF-8"' > /etc/locale.conf
# export LC_ALL=zh_CN.UTF-8
1.2 安装Python3
#我这里直接在机器上面安装python3了就不搞Python虚拟环境了
# yum -y install wget gcc epel-release git zlib-devel openssl-devel
# wget https://www.python.org/ftp/python/3.6.7/Python-3.6.7.tgz
# tar zxf Python-3.6.7.tgz
# cd Python-3.6.7
# ./configure --prefix=/usr/local/python3.6
# make && make install
# ln -s /usr/local/python3.6 /usr/local/python3
# ln -sf /usr/local/python3/bin/python3.6 /usr/bin/python
# mv /usr/bin/pip /usr/bin/pip.bak
# ln -s /usr/local/python3/bin/pip3.6 /usr/bin/pip
#由于更改系统默认的python会影响yum,需修改如下两个文件:
# vim /usr/bin/yum
#!/usr/bin/python2.7
# vim /usr/libexec/urlgrabber-ext-down
#! /usr/bin/python2.7
#配置完后自行yum个软件包看看yum是否OK。
1.3 安装Mysql和Redis
#Mysql和Redis一般安装在其他地方,我这里就安装到一起了。
# yum install mariadb mariadb-server mariadb-devel -y
# service mariadb start
# cd ..
# wget http://download.redis.io/releases/redis-4.0.11.tar.gz
# tar zxf redis-4.0.11.tar.gz
# cd redis-4.0.11
# make
# make install
# vim redis.conf
# bind 127.0.0.1  # 注释这行,新增如下内容
bind 0.0.0.0
requirepass Redis123  #redis 连接密码
maxmemory-policy allkeys-lru  #清理策略,优先移除最近未使用的key
# redis-server redis.conf &
1.4 安装Jumpserver
# cd /opt/
# git clone https://github.com/jumpserver/jumpserver.git
# cd /opt/jumpserver/requirements/
# yum -y install $(cat rpm_requirements.txt)
# pip install --upgrade pip setuptools
# pip install pymysql
# pip install -r requirements.txt
博文来自:www.51niux.com
#注意最新版的比如jumpserver2.x版本的要安装的依赖要更多,需要提前进行一些依赖包的安装省的出现某些依赖包pip失败的情况#yum install mysql-devel python-ldap openldap-devel python-devel zlib-devel openssl-devel -y
1.5 数据库授权并修改配置文件
创建数据库 Jumpserver 并授权:
# mysql -uroot
MariaDB [(none)]> create database jumpserver default charset 'utf8';
MariaDB [(none)]> grant all on jumpserver.* to 'jumpserver'@'127.0.0.1' identified by 'jump123';
MariaDB [(none)]> flush privileges;
MariaDB [(none)]> quit
修改 Jumpserver 配置文件:
# cd /opt/jumpserver/
# cp config_example.py config.py
# vim config.py
import os

BASE_DIR = os.path.dirname(os.path.abspath(__file__))


class Config:
    #SECRET_KEY = os.environ.get('SECRET_KEY') or '2vym+ky!997d5kkcc64mnz06y1mmui3lut#(^wd=%s_qj$1%x'
    SECRET_KEY = '2vym+ky!997d5kkcc64mnz06y1mmui3lut#(^wd=%s_qj$1%x'  #使用 SECRET_KEY 进行加密

    # Django security setting, if your disable debug model, you should setting that
    ALLOWED_HOSTS = ['*']

    # Development env open this, when error occur display the full process track, Production disable it
    #DEBUG = os.environ.get("DEBUG") or True
    DEBUG = False
    #DEBUG 模式 True为开启 False为关闭,默认开启,生产环境推荐关闭
    #注意:如果设置了DEBUG = False,访问8080端口页面会显示不正常,需要搭建 nginx 代理才可以正常访问

    # DEBUG, INFO, WARNING, ERROR, CRITICAL can set. See https://docs.djangoproject.com/en/1.10/topics/logging/
    #LOG_LEVEL = os.environ.get("LOG_LEVEL") or 'DEBUG'
    LOG_LEVEL = 'ERROR'
    # 日志级别,默认为DEBUG,可调整为INFO, WARNING, ERROR, CRITICAL,默认INFO
    LOG_DIR = os.path.join(BASE_DIR, 'logs')

    # Database setting, Support sqlite3, mysql, postgres ....
    # See https://docs.djangoproject.com/en/1.10/ref/settings/#databases

    # SQLite setting:  #默认使用SQLite3,如果使用其他数据库注释下面两行
    #DB_ENGINE = 'sqlite3'
    #DB_NAME = os.path.join(BASE_DIR, 'data', 'db.sqlite3')

    # MySQL or postgres setting like:  #如果使用mysql就要像下面这样设置
    DB_ENGINE = 'mysql'
    DB_HOST = '127.0.0.1'
    DB_PORT = 3306
    DB_USER = 'jumpserver'
    DB_PASSWORD = 'jump123'
    DB_NAME = 'jumpserver'

    # When Django start it will bind this host and port  # Django 监听的ip和端口
    # ./manage.py runserver 127.0.0.1:8080
    HTTP_BIND_HOST = '0.0.0.0'
    HTTP_LISTEN_PORT = 8080

    # Use Redis as broker for celery and web socket  ## Redis 相关设置
    REDIS_HOST = '127.0.0.1'
    REDIS_PORT = 6379
    REDIS_PASSWORD = 'Redis123'
    REDIS_DB_CELERY = 3
    REDIS_DB_CACHE = 4

    # Use OpenID authorization
    # BASE_SITE_URL = 'http://localhost:8080'
    # AUTH_OPENID = False  # True or False
    # AUTH_OPENID_SERVER_URL = 'https://openid-auth-server.com/'
    # AUTH_OPENID_REALM_NAME = 'realm-name'
    # AUTH_OPENID_CLIENT_ID = 'client-id'
    # AUTH_OPENID_CLIENT_SECRET = 'client-secret'

    def __init__(self):
        pass

    def __getattr__(self, item):
        return None

class DevelopmentConfig(Config):
    pass

class TestConfig(Config):
    pass

class ProductionConfig(Config):
    pass

# Default using Config settings, you can write if/else for different env
config = DevelopmentConfig()
# BOOTSTRAP_TOKEN = 'nwv4RdXpM82LtSvmV' # 预共享Token coco和guacamole用来注册服务账号,不在使用原来的注册接受机制
#在新版本增加了这个字段,就是为了解决之前coco注册还要等待jumpserver管理台点击下确认,cocod和jumpserver这里要配置一致就可验证
生成随机 SECRET_KEY:
$ source /opt/py3/bin/activate
$ cd /opt/jumpserver/apps
$ python manage.py shell
>>> from django.core.management.utils import get_random_secret_key
>>> get_random_secret_key()
生成数据库表结构和初始化数据:
# cd /opt/jumpserver/utils
# ln -s /usr/bin/python /usr/bin/python3
# sh make_migrations.sh
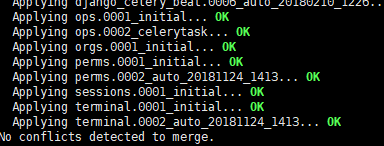
#执行这个脚本要等一下,不过可以看到整个执行过程没有报错上图是最后状态。
查看数据库:
# mysql -uroot -e "SELECT count(TABLE_NAME) FROM information_schema.TABLES WHERE TABLE_SCHEMA='jumpserver';"
+-------------------+
| count(TABLE_NAME) |
+-------------------+
|                59 |
+-------------------+
#从Jumpserver数据库查询一下可以看到表的数量是59个。
运行 Jumpserver :
# cd /opt/jumpserver/
# ./jms start all #第一次运行嘛,前台输出看看有什么报错# 后台运行使用 -d 参数./jms start all -d
# 新版本更新了运行脚本,使用方式./jms start|stop|status|restart all 后台运行请添加 -d 参数
注:
运行不报错,请浏览器访问 http://IP:8080/ 默认账号: admin 密码: admin 页面显示不正常先不用处理,继续往下操作,后面搭建 nginx 代理后即可正常访问,原因是因为 django 无法在非 debug 模式下加载静态资源。
好启动遇到第一个问题:
0 static files copied to '/opt/jumpserver/data/static', 524 unmodified.

- Start Gunicorn WSGI HTTP Server
Traceback (most recent call last):
  File "./jms", line 338, in <module>
    start_service(srv)
  File "./jms", line 239, in start_service
    p = func()
  File "./jms", line 161, in start_gunicorn
    p = subprocess.Popen(cmd, stdout=sys.stdout, stderr=sys.stderr, cwd=APPS_DIR)
  File "/usr/local/python3/lib/python3.6/subprocess.py", line 709, in __init__
    restore_signals, start_new_session)
  File "/usr/local/python3/lib/python3.6/subprocess.py", line 1344, in _execute_child
    raise child_exception_type(errno_num, err_msg, err_filename)
FileNotFoundError: [Errno 2] No such file or directory: 'gunicorn': 'gunicorn'
解决办法:
# vim /etc/profile
PY_HOME=/usr/local/python3
PATH=$PATH:$PY_HOME/bin
# source /etc/profile
# ./jms start all #再次启动一下
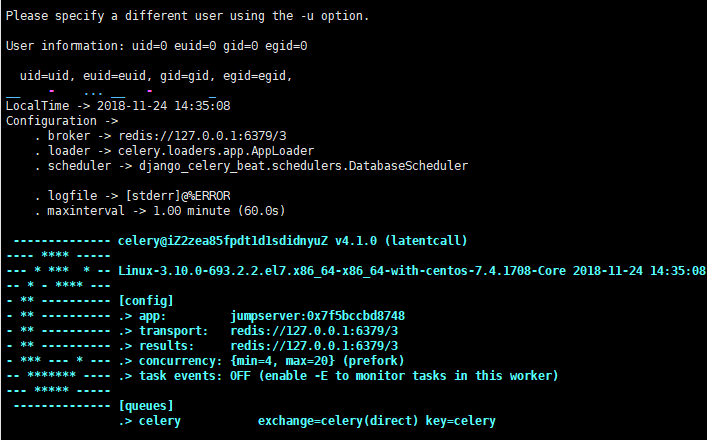
#上图为启动起来的正常情况
# netstat -lntup|grep python #可以看到端口已经起来了
tcp 0 0 0.0.0.0:8080 0.0.0.0:* LISTEN 8726/python3.6
#注意在新版的2.3版本是koko,但是这个启动要注意一下,一定要#cd /opt/koko/ && ./koko -d,不然会报下面的错误,当然后面应该会修正
Koko Version v2.3.0, more see https://www.jumpserver.org
Quit the server with CONTROL-C.
panic: html/template: pattern matches no files: `./templates/**/*`

goroutine 36 [running]:
html/template.Must(...)
        /usr/local/go/src/html/template/template.go:372
github.com/gin-gonic/gin.(*Engine).LoadHTMLGlob(0xc0002228c0, 0x12fc912, 0x10)
        /go/pkg/mod/github.com/gin-gonic/gin@v1.6.3/gin.go:185 +0x362
github.com/jumpserver/koko/pkg/httpd.registerHandlers(0xc0001a7800, 0x12f45dd)
        /github/workspace/pkg/httpd/webserver.go:244 +0x1b4
github.com/jumpserver/koko/pkg/httpd.(*server).Start(0xc0001a7800)
        /github/workspace/pkg/httpd/webserver.go:56 +0x159
github.com/jumpserver/koko/pkg/httpd.StartHTTPServer()
        /github/workspace/pkg/httpd/webserver.go:291 +0x2d
created by github.com/jumpserver/koko/pkg/koko.(*Coco).Start
        /github/workspace/pkg/koko/koko.go:30 +0x1ce
三、安装 SSH Server 和 WebSocket Server: Coco
3.1 Clone 项目并安装依赖
# cd /opt/
# git clone https://github.com/jumpserver/coco.git
# cd /opt/coco/requirements
# yum -y install $(cat rpm_requirements.txt)
# pip install -r requirements.txt
博文来自:www.51niux.com
3.2 修改配置文件
# cd /opt/coco/
# mkdir keys logs
# cp conf_example.py conf.py #只粘贴修改部分
# NAME = "localhost"  #项目名称, 会用来向Jumpserver注册,识别而已,不能重复
NAME = "ZD_214"   #coco服务我们看架构图已经知道了它负责接收用户的ssh请求然后转交给jumpserver,所以这就相当于一个终端代理,所以要有标示性
# CORE_HOST = os.environ.get("CORE_HOST") or '  # Jumpserver项目的url, api请求注册会使用
CORE_HOST = 'http://127.0.0.1:8080'
# BOOTSTRAP_TOKEN = 'nwv4RdXpM82LtSvmV' # 预共享Token coco和guacamole用来注册服务账号,不在使用原来的注册接受机制
#在新版本增加了这个字段,就是为了解决之前coco注册还要等待jumpserver管理台点击下确认,cocod和jumpserver这里要配置一致就可验证,注册完成后可以删除。
四、 安装 Web Terminal 前端: Luna
Luna 已改为纯前端,需要 Nginx 来运行访问,访问(https://github.com/jumpserver/luna/releases)下载对应版本的 release 包,直接解压,不需要编译。
# cd /opt/soft
#wget https://github.com/jumpserver/luna/releases/download/1.4.6/luna.tar.gz
#tar zxf luna.tar.gz
#cp -rf /opt/soft/luna /opt/
#chown -R root:root /opt/luna
五、配置 Nginx 整合各组件
#useradd www -s /sbin/nologin -u 500
# yum install pcre pcre-devel -y
# wget nginx.org/download/nginx-1.15.6.tar.gz
# tar zxf nginx-1.15.6.tar.gz
# cd nginx-1.15.6
# mkdir /application
# ./configure --user=www --group=www --prefix=/application/nginx-1.15.6 --with-http_stub_status_module --with-http_ssl_module --with-http_realip_module
# make && make install
# ln -s /application/nginx-1.15.6 /application/nginx
# mkdir /opt/logs
# chown -R www:www /opt/logs/
# cat /application/nginx/conf/nginx.conf
user  www;
worker_processes  2;

error_log  /opt/logs/error.log;
#error_log  logs/error.log  notice;
#error_log  logs/error.log  info;

pid        /opt/logs/nginx.pid;


events {
    worker_connections  10240;
}


http {
    include       mime.types;
    default_type  application/octet-stream;

    log_format  main  '$remote_addr - $remote_user [$time_local] "$request" '
                      '$status $body_bytes_sent "$http_referer" '
                      '"$http_user_agent" "$http_x_forwarded_for"';

    access_log  /opt/logs/access.log  main;

    sendfile        on;
    #tcp_nopush     on;

    #keepalive_timeout  0;
    keepalive_timeout  65;

    #gzip  on;
    server {
      listen 80;  # 代理端口,以后将通过此端口进行访问,不再通过8080端口
      server_name localhost;  # 修改成你的域名

      client_max_body_size 100m;  # 录像及文件上传大小限制

      location /luna/ {
          try_files $uri / /index.html;
          alias /opt/luna/;  # luna 路径,如果修改安装目录,此处需要修改
      }

      location /media/ {
          add_header Content-Encoding gzip;
          root /opt/jumpserver/data/;  # 录像位置,如果修改安装目录,此处需要修改
      }

      location /static/ {
          root /opt/jumpserver/data/;  # 静态资源,如果修改安装目录,此处需要修改
      }

      location /socket.io/ {
          proxy_pass       http://localhost:5000/socket.io/;  # 如果coco安装在别的服务器,请填写它的ip
          proxy_buffering off;
          proxy_http_version 1.1;
          proxy_set_header Upgrade $http_upgrade;
          proxy_set_header Connection "upgrade";
          proxy_set_header X-Real-IP $remote_addr;
          proxy_set_header Host $host;
          proxy_set_header X-Forwarded-For $proxy_add_x_forwarded_for;
          access_log off;
      }

      location /coco/ {
          proxy_pass       http://localhost:5000/coco/;  # 如果coco安装在别的服务器,请填写它的ip
          proxy_set_header X-Real-IP $remote_addr;
          proxy_set_header Host $host;
          proxy_set_header X-Forwarded-For $proxy_add_x_forwarded_for;
          access_log off;
      }

      location /guacamole/ {
          proxy_pass       http://localhost:8081/;  # 如果guacamole安装在别的服务器,请填写它的ip
          proxy_buffering off;
          proxy_http_version 1.1;
          proxy_set_header Upgrade $http_upgrade;
          proxy_set_header Connection $http_connection;
          proxy_set_header X-Real-IP $remote_addr;
          proxy_set_header Host $host;
          proxy_set_header X-Forwarded-For $proxy_add_x_forwarded_for;
          access_log off;
      }

      location / {
          proxy_pass http://localhost:8080;  # 如果jumpserver安装在别的服务器,请填写它的ip
          proxy_set_header X-Real-IP $remote_addr;
          proxy_set_header Host $host;
          proxy_set_header X-Forwarded-For $proxy_add_x_forwarded_for;
      }
  }
}
# /application/nginx/sbin/nginx -t
# /application/nginx/sbin/nginx
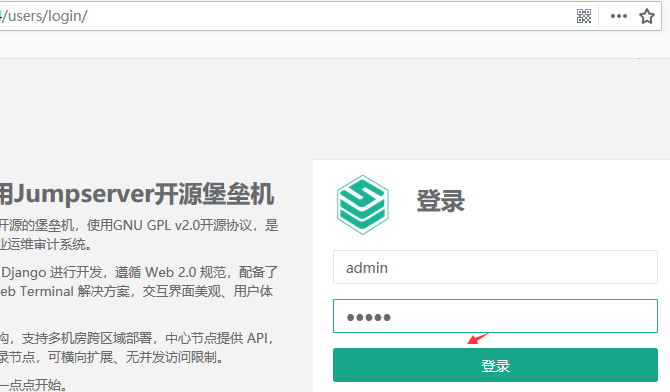
#验证码存储表:captcha_captchastore
#直接以IP的形式就会跳转到登录页面。默认账号: admin 密码: admin
如果admin密码忘记了怎么办?
改密码之前查看下数据库:
MariaDB [jumpserver]> select * from users_user\G
*************************** 1. row ***************************
       password: pbkdf2_sha256$120000$Swq259rTG6Lc$E6DTKJEyjeyQzQOzjcgSoqfrqn0LNhHyj8zjg9HhGR0=
     last_login: 2018-11-24 07:08:20.688742
     first_name:
      last_name:
      is_active: 1
    date_joined: 2018-11-24 06:13:12.436765
             id: a4170200d46540c1b3ac335e444e976e
       username: admin
           name: Administrator
          email: admin@mycomany.com
           role: Admin
         avatar:
         wechat:
          phone: NULL
   _private_key:
    _public_key:
        comment:
 is_first_login: 0
   date_expired: 2088-11-06 06:13:12.436877
     created_by:
_otp_secret_key: NULL
      otp_level: 0
         source: local
1 row in set (0.00 sec)
修改密码:
# python /opt/jumpserver/apps/manage.py changepassword admin
Changing password for user 'Administrator(admin)'
Password:
Password (again):
Password changed successfully for user 'Administrator(admin)'
再次查看:
MariaDB [jumpserver]> select * from users_user\G
*************************** 1. row ***************************
       password: pbkdf2_sha256$120000$ZHA8H8x8T1D3$Pbmq5dq5RhCMFDl6/cJfFTEAV1EVfDI6zrMgsqVhOTE=
如果admin用户不存在或者又想名称创建一个超级管理员呢?
# python /opt/jumpserver/apps/manage.py createsuperuser --username=admin1 --email=admin1@domain.com
Password:
Password (again):
Superuser created successfully.

#从截图中可以看到有多了一个管理员用户是admin1。
六、Coco注册
6.1 Coco注册
#前面只是安装和配置了Coco,但是还未启动服务啊,下面启动服务并且注册一下。
#在最新版本的jumpserver已经无需这样注册了,只需要在配置文件中设置跟jumpserver一致的BOOTSTRAP_TOKEN就可以。
博文来自:www.51niux.com
启动coco服务:
# cd /opt/coco/
# ./cocod start #后台运行使用 -d 参数./cocod start -d
2018-11-24 15:20:52 [service DEBUG] Initial app service
2018-11-24 15:20:52 [service DEBUG] Load access key
2018-11-24 15:20:52 [service INFO] No access key found, register it
2018-11-24 15:20:52 [service INFO] "Terminal was not accepted yet"
2018-11-24 15:20:55 [service INFO] "Terminal was not accepted yet"
查看jumpserver的输出:
127.0.0.1 [24/Nov/2018:15:21:44 +0800] "GET /api/terminal/v1/terminal/b863bb7b-f027-4dd8-9309-3afec59c75da/access-key?token=aeb8256100874cc8ba9a92e6ab8b6881 HTTP/1.1" 301 0
127.0.0.1 [24/Nov/2018:15:21:44 +0800] "GET /api/terminal/v1/terminal/b863bb7b-f027-4dd8-9309-3afec59c75da/access-key/?token=aeb8256100874cc8ba9a92e6ab8b6881 HTTP/1.1" 400 31
127.0.0.1 [24/Nov/2018:15:21:47 +0800] "GET /api/terminal/v1/terminal/b863bb7b-f027-4dd8-9309-3afec59c75da/access-key?token=aeb8256100874cc8ba9a92e6ab8b6881 HTTP/1.1" 301 0
127.0.0.1 [24/Nov/2018:15:21:47 +0800] "GET /api/terminal/v1/terminal/b863bb7b-f027-4dd8-9309-3afec59c75da/access-key/?token=aeb8256100874cc8ba9a92e6ab8b6881 HTTP/1.1" 400 31
#上述现象正常的,因为还有得到认证。#启动成功后去Jumpserver 会话管理-终端管理(http://IP:8080/terminal/terminal/)接受coco的注册
jumpserver服务端认证:
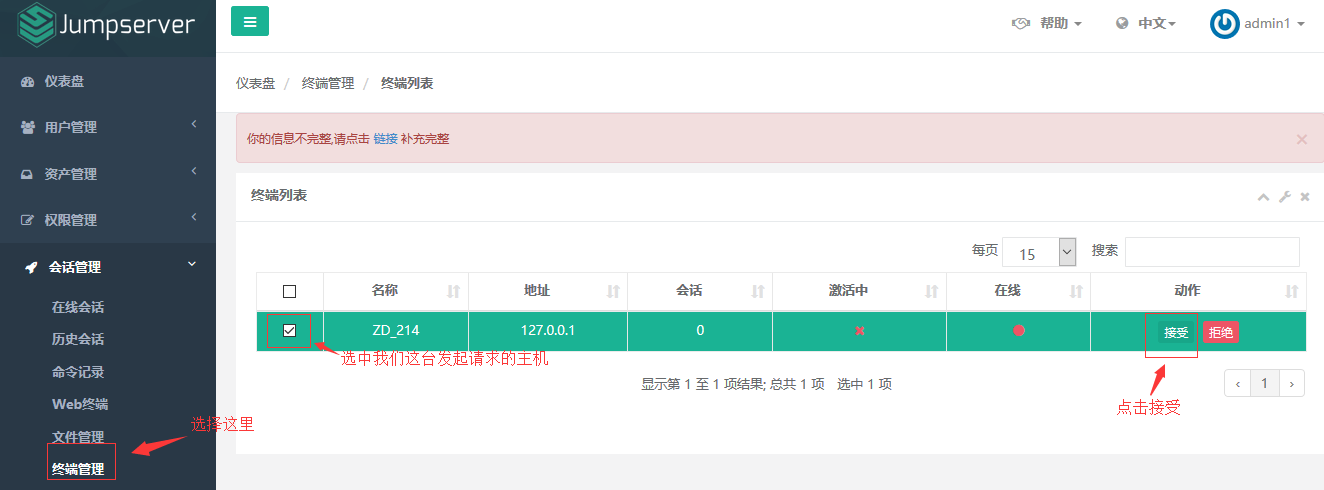
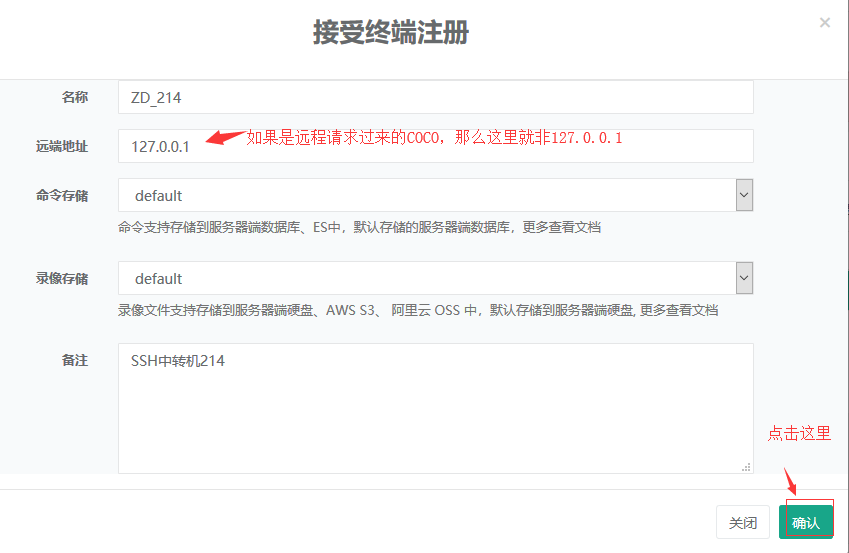
#表名称terminal
再看coco服务的输出:
2018-11-24 15:26:42 [service INFO] "Terminal was not accepted yet"
2018-11-24 15:26:45 [service INFO] "Terminal was not accepted yet"
2018-11-24 15:26:48 [service DEBUG] Set app service auth: a834a526-9b1c-4e26-93cf-219491830e24
2018-11-24 15:26:48 [service DEBUG] Service http auth: <jms.auth.AccessKeyAuth object at 0x7f47e0a7b748>
Start coco process
2018-11-24 15:26:48 [app DEBUG] Loading config from server: {"COMMAND_STORAGE": {"TYPE": "server"}, "REPLAY_STORAGE": {"TYPE": "server"}, "SECURITY_MAX_IDLE_TIME": 30}
Sat Nov 24 15:26:48 2018
Coco version 1.4.4, more see https://www.jumpserver.org
Quit the server with CONTROL-C.
Starting ssh server at 0.0.0.0:2222
Starting websocket server at 0.0.0.0:5000
# ls -l /opt/coco/keys/.access_key #注册成功会有key产生的
-rw-r--r-- 1 root root 73 11月 24 15:36 /opt/coco/keys/.access_key
注意:
如果你./cocod start 但是并没有在jumpserver上面认证就手工停止cocod服务的话,那么当你再次启动的话会提示你名称已经存在。如下面:
# ./cocod start #启动一下然后在还没完成注册的时候手工停止掉。
# ./cocod start #再次启动一下,就会有报错信息了
2018-11-24 15:31:18 [service DEBUG] Initial app service
2018-11-24 15:31:18 [service DEBUG] Load access key
2018-11-24 15:31:18 [service INFO] No access key found, register it
2018-11-24 15:31:18 [service ERROR] Failed register terminal ZD_214 exist already
解决方法:


#先注册然后再删除......
查看现在启动的端口:
# netstat -lntup
Active Internet connections (only servers)
Proto Recv-Q Send-Q Local Address           Foreign Address         State       PID/Program name
tcp        0      0 127.0.0.1:6379          0.0.0.0:*               LISTEN      5586/redis-server 1
tcp        0      0 0.0.0.0:2222            0.0.0.0:*               LISTEN      12662/python3
tcp        0      0 0.0.0.0:8080            0.0.0.0:*               LISTEN      12567/python3.6
tcp        0      0 0.0.0.0:80              0.0.0.0:*               LISTEN      12044/nginx: master
tcp        0      0 0.0.0.0:22              0.0.0.0:*               LISTEN      5998/sshd
tcp        0      0 0.0.0.0:5000            0.0.0.0:*               LISTEN      12662/python3
tcp        0      0 0.0.0.0:3306            0.0.0.0:*               LISTEN      5850/mysqld
端口说明:
Jumpserver 默认端口为 8080/tcp 配置文件在 jumpserver/config.py
Coco 默认 SSH 端口为 2222/tcp ,默认 Web Terminal 端口为 5000/tcp 配置文件在 coco/conf.py
Guacamole 默认端口为 8081/tcp 在 docker run 时指定(这是控制windows的我这里就没安装)
Nginx 默认端口为 80/tcp
Redis 默认端口为 6379/tcp
Mysql 默认端口为 3306/tcp
| Protocol | Server name | Port | Used By |
|---|---|---|---|
| TCP | Jumpserver | 80, 8080 | Nginx, Coco, Guacamole |
| TCP | Coco | 2222, 5000 | Nginx |
| TCP | Guacamole | 8081 | Nginx |
| TCP | Db | 3306 | Jumpserver |
| TCP | Redis | 6379 | Jumpserver |
| TCP | Nginx | 80, 2222 | All |
6.2 测试连接
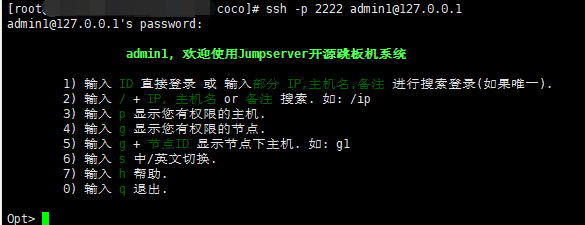
#如果能登陆代表部署成功。
6.3 Systemd 管理启动 Jumpserver
#这个启动就是直接摘自官网
# 适合按照一步一步文档进行安装的用户, Centos 7

# Jumpserver
$ sed -i "s/START_TIMEOUT = 15/START_TIMEOUT = 40/g" /opt/jumpserver/jms
$ cat << EOF > /usr/lib/systemd/system/jms.service
[Unit]
Description=jms
After=network.target mariadb.service redis.service
Wants=mariadb.service redis.service

[Service]
Type=forking
Environment="PATH=/opt/py3/bin:/usr/local/sbin:/usr/local/bin:/usr/sbin:/usr/bin:/root/bin"
ExecStart=/opt/jumpserver/jms start all -d
ExecReload=
ExecStop=/opt/jumpserver/jms stop

[Install]
WantedBy=multi-user.target

EOF

# Coco
$ cat << EOF > /usr/lib/systemd/system/coco.service
[Unit]
Description=coco
After=network.target jms.service

[Service]
Type=forking
Environment="PATH=/opt/py3/bin"
ExecStart=/opt/coco/cocod start -d
ExecReload=
ExecStop=/opt/coco/cocod stop

[Install]
WantedBy=multi-user.target

EOF

# Guacamole
$ chkconfig guacd on
$ sed -i '143i CATALINA_PID="$CATALINA_BASE/tomcat.pid"' /config/tomcat8/bin/catalina.sh
$ cat << EOF > /usr/lib/systemd/system/tomcat.service
[Unit]
Description=guacamole
After=network.target jms.service
Wants=jms.service

[Service]
Type=forking
PIDFile=/config/tomcat8/tomcat.pid
Environment="JUMPSERVER_SERVER=http://127.0.0.1:8080" "JUMPSERVER_KEY_DIR=/config/guacamole/keys" "GUACAMOLE_HOME=/config/guacamole"
ExecStart=/config/tomcat8/bin/startup.sh
ExecReload=
ExecStop=/config/tomcat8/bin/shutdown.sh

[Install]
WantedBy=multi-user.target

EOF

# 开机自启设置
$ systemctl enable jms
$ systemctl enable coco
$ systemctl enable guacamole

# 启动
$ systemctl start jms
$ systemctl start coco
$ systemctl start guacamole

# 停止
$ systemctl stop jms
$ systemctl stop coco
$ systemctl stop guacamole
