Nginx+Consul+Upsync实现动态负载均衡(三)
以往我们都使用的静态后端配置文件的方式,这就导致了每次都需要修改配置文件并reload,每次后端有变动要手工修改配置文件,这时候你想让你的后端动态变化起来,后端的IP变化了比如测试环境的容器IP变化了,你nginx无需reload,请求的后端就改为了最新的后端,那么就是本次文章要介绍的内容了。
一、nginx编译并使用Upsync
1.1 nginx编译upsync
Upsync是微博开源的一个基于nginx实现动态配置的模块,通过拉取consul的上游数据,实现无需重新加载nginx,动态修改后端服务器属性的目录,git地址:https://github.com/weibocom/nginx-upsync-module
#cd /opt/soft/package
#wget https://github.com/weibocom/nginx-upsync-module/archive/master.zip
#unzip master.zip
#cd nginx-1.26.2 #nginx的下载和解压就不再演示了
#./configure --prefix=/opt/soft/nginx --sbin-path=/opt/soft/nginx/sbin/nginx --conf-path=/opt/soft/nginx/main-conf/nginx.conf --error-log-path=/opt/log/nginx/error.log --http-log-path=/opt/log/nginx/access.log --pid-path=/opt/soft/nginx/run/nginx.pid --lock-path=/opt/soft/nginx/run/nginx.lock --user=work --group=work --http-client-body-temp-path=/opt/soft/nginx/cache/client_temp --http-proxy-temp-path=/opt/soft/nginx/cache/proxy_temp --http-fastcgi-temp-path=/opt/soft/nginx/cache/fastcgi_temp --http-uwsgi-temp-path=/opt/soft/nginx/cache/uwsgi_tmp --http-scgi-temp-path=/opt/soft/nginx/cache/scgi_temp --with-http_v2_module --with-http_stub_status_module --with-http_ssl_module --with-http_realip_module --with-http_sub_module --with-http_gzip_static_module --with-pcre --with-http_addition_module --with-http_image_filter_module --with-http_dav_module --with-http_flv_module --with-http_mp4_module --with-http_gunzip_module --with-http_gzip_static_module --with-http_gzip_static_module --with-file-aio --add-module=/opt/soft/package/nginx-upsync-module-master
#make -j 4
#make install
#mkdir /opt/soft/nginx/cache/
#chown work:work /opt/soft/nginx/cache -R
#vim /opt/soft/nginx/main-conf/nginx.conf #修改配置文件就不多做介绍了,主要增加include:include /opt/soft/nginx/conf.d/*.conf;
# cat /opt/soft/package/nginx-upsync-module-master/README.md #可以看看使用示例这里就不多做介绍了
1.2 nginx使用upsync
试验1(基本配置并拉取什么样的配置信息):

#从上图我们可以看到配置了两种key一种带端口的一种不带端口的,我们看看是如何加载的
# cat /opt/soft/nginx/conf.d/grafana_pool_upstream.conf
upstream grafana_pool {
   #server 127.0.0.1:8080;
   upsync 192.168.1.166:8500/v1/kv/offline/upstream/grafana/ upsync_timeout=5s upsync_interval=500ms upsync_type=consul strong_dependency=off;
   upsync_dump_path /data/nginx/conf/grafana_upstream.conf;
   include  /data/nginx/conf/grafana_upstream.conf;
}
# /opt/soft/nginx/sbin/nginx -t #报错很清晰啊,找不到配置文件,不应该啊,不应该自动创建配置文件吗如果目录存在的话
nginx: [emerg] open() "/data/nginx/conf/grafana_upstream.conf" failed (2: No such file or directory) in /opt/soft/nginx/conf.d/grafana_pool_upstream.conf:5
nginx: configuration file /opt/soft/nginx/main-conf/nginx.conf test failed
# touch /data/nginx/conf/grafana_upstream.conf
# /opt/soft/nginx/sbin/nginx -t #又有新的错误了,注意我配置文件一直注释着一行呢,就是那里我们打开一下试一试
nginx: [emerg] no servers are inside upstream in /opt/soft/nginx/conf.d/grafana_pool_upstream.conf:6
nginx: configuration file /opt/soft/nginx/main-conf/nginx.conf test failed
# cat /opt/soft/nginx/conf.d/grafana_pool_upstream.conf
upstream grafana_pool {
      #server这是一个固定格式,配置文件配置上就行
   server 127.0.0.1:11111 down;
   #upsync_timeout从consul拉取的超时时间,upsync_interval从consul拉取服务信息的时间间隔,upsync_type指定使用什么类型的服务
   #strong_dependency配置nginx在启动时是否强依赖配置服务器,如果配置为on,则拉取配置失败时Nginx启动或者检测就会报错,如果是off就是拉取失败还读取本地配置
   upsync 192.168.1.166:8500/v1/kv/offline/upstream/grafana/ upsync_timeout=5s upsync_interval=500ms upsync_type=consul strong_dependency=off;
   #指定从consul拉取的上游服务器后持久化到的文件为止,这样即使consul配置拉取失败,本地有备份依旧会走本地
   upsync_dump_path /data/nginx/conf/grafana_upstream.conf;
   #加载本地的配置文件
   include /data/nginx/conf/grafana_upstream.conf;
}
# /opt/soft/nginx/sbin/nginx -t
nginx: the configuration file /opt/soft/nginx/main-conf/nginx.conf syntax is ok
nginx: configuration file /opt/soft/nginx/main-conf/nginx.conf test is successful
# /opt/soft/nginx/sbin/nginx
# cat /data/nginx/conf/grafana_upstream.conf #可以看到创建的文件中有内容了,里面只记录带端口的key信息,权重之类的现在是默认的
server 192.168.1.166:3000 weight=1 max_fails=2 fail_timeout=10s;
server 192.168.1.165:3000 weight=1 max_fails=2 fail_timeout=10s;
server 192.168.1.164:3000 weight=1 max_fails=2 fail_timeout=10s;
博文来自:www.51niux.com
试验2(自动创建配置文件):
#上个例子我们可以看到,本地备份的配置文件是需要手工创建的,不然就会提示加载不到,怎么解决这个问题呢,其中有两种方法,第一种很简单就是这些nginx配置文件肯定也是程序生成的,就是在生成配置文件的时候同时生成include加载的配置文件,第二种也不复杂就是注意命名的唯一,好了下面展示第二种方法。
# rm -f /data/nginx/conf/grafana_upstream.conf #先把我们产生的测试upstream.conf配置文件删掉,确保目录是空的
# cat grafana_pool_upstream.conf #就是用include *正则配置文件的方式,所以要确保前缀是唯一的
upstream grafana_pool {
   server 127.0.0.1:11111 down;
   upsync 192.168.1.166:8500/v1/kv/offline/upstream/grafana/ upsync_timeout=5s upsync_interval=500ms upsync_type=consul strong_dependency=off;
   upsync_dump_path /data/nginx/conf/grafana_upstream.conf;
   include  /data/nginx/conf/grafana_*.conf;
}
# /opt/soft/nginx/sbin/nginx -t #可自行验证,是没问题的
试验3(测试一下把nginx配置文件中的consul服务停掉,请求是否会读取本地):
这里的试验方式呢,就是写个for循环一直curl然后你通过nginx的请求日志看看后端的生效方式:
试验3.1
我们将offline/upstream/grafana/下面的key清空,或者估计配置错offline/upstream/grafana123/,或者你配置的consul服务端连接不上的时候,这时候你重启nginx会发现不报错,因为获取不到新的key信息,所以/data/nginx/conf/grafana_upstream.conf中保留的是最后一份能获取到信息的后端配置内容,当然将/data/nginx/conf/grafana_upstream.conf删除掉之后再重启nginx是灌不进来任何信息的。
但是啊,虽然grafana_upstream.conf是空的,因为获取不到具体的后端配置,这时候我们配置的127.0.0.1那个就登场了,如果换成一个优雅的报错页面是不是就更好了。

试验3.2
承接上面的例子,现在我们请求走的是127.0.0.1,这时候我们往grafana下面增加一个key,你会发现请求就到了新的key上面,也就是能获取到后端就走指定的后端,没获取到后端再走默认的server。
试验3.3
承接上面的例子,现在的grafana_upstream.conf已经有一个后端了,我们现在把nginx配置的consul关闭掉,看看请求会不会走本地的配置文件去转发,答案是依旧可以。
试验3.4
承接上面的例子,我们把nginx重启一下,让其直接加载后端配置文件,我们看看curl的效果,直接说结果,你会发现并不是完全请求后端配置文件中的后端,偶尔会出现请求127.0.0.1不通再跳转到新后端的情况,也不是一直出现,是间隔一段时间出现一次
 HTTP/1.1" 301 234 "-" "curl/7.29.0" "-" "-" 0.001 127.0.0.1:11111, 192.168.1.228:80 502, 301 0.001, 0.000
 HTTP/1.1" 301 234 "-" "curl/7.29.0" "-" "-" 0.001 192.168.1.228:80 301 0.001
 ......
 HTTP/1.1" 301 234 "-" "curl/7.29.0" "-" "-" 0.001 127.0.0.1:11111, 192.168.1.228:80 502, 301 0.000, 0.000
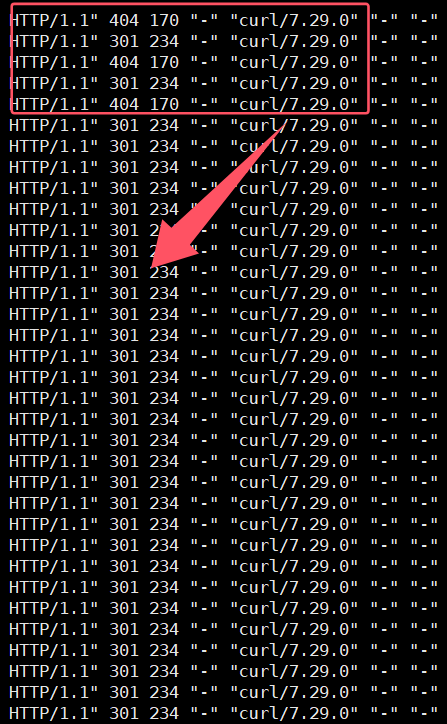
这时候我们将nginx连接的consul恢复,然后增加一个新key,然后查看下请求方式,可以看到后端开始交替轮询了:
HTTP/1.1" 301 234 "-" "curl/7.29.0" "-" "-" 0.000 192.168.1.228:80 301 0.000
HTTP/1.1" 404 170 "-" "curl/7.29.0" "-" "-" 0.001 192.168.1.230:80 404 0.001
HTTP/1.1" 301 234 "-" "curl/7.29.0" "-" "-" 0.001 192.168.1.228:80 301 0.001
HTTP/1.1" 404 170 "-" "curl/7.29.0" "-" "-" 0.001 192.168.1.230:80 404 0.001
试验3.5
承接上面的例子,这时候我们把consul再次关闭,不重启nginx,然后将grafana_upstream.conf里面的后端悄悄的删去一个只保留192.168.1.228,再次重新curl起来,你会发现只要请求的还是consul关闭之前的后端配置,也就是说算你consul关闭了,只要nginx不重新加载,缓存中一直是最后一次的配置依旧是可以正常使用的(当然是前提你consul集群没有更新新配置的情况下,因为现在nginx已经跟consul断开连接了,consul的更新nginx也不会及时更新了)。
当我们nginx重新reload的时候呢,就会发现它重新回到了试验3.4的效果,请求除了大部分走到192.168.1.228上面外偶尔还会请求下127.0.0.1。
总结:通过上面的几个试验,我们可以知道nginx+upsync在各种情况下的请求转发,主要就是当consul出问题的时候,只要你nginx不重启,nginx就走最后一份路由缓存中的后端配置,如果你nginx重启了因为consul连接不上嘛,它就会加载你备份的后端配置文件中的配置,当你consul恢复后,会重新更新缓存。
博文来自:www.51niux.com
1.3 结合使用nginx_upstream_check_module
又要一个新的问题,如果你不是一个单一的后端,你有多个后端,用这种key/value得方式并不会健康检测,现在如果你consul获取多个后端,如果有一个节点有问题,是不是通过nginx的主动探测,不将流量转发给异常节点是不是就更好一点了,这就是要介绍的模块,具体介绍可搜网上面的信息。
直接说问题,现阶段是这样啊,如果nginx-upsync-module和nginx_upstream_check_module不配合使用你是可以使用nginx的最新版本的,但是要配合使用的话,nginx就要降版本,不然会有下面的报错(当然如果nginx版本是1.20+的话也不能用https://github.com/yaoweibin/nginx_upstream_check_module.git得用https://github.com/xiaokai-wang/nginx_upstream_check_module.git):
objs/addon/src/ngx_http_upsync_module.o:在函数‘ngx_http_upsync_add_peers’中:
/opt/soft/package/nginx-upsync-module/src/ngx_http_upsync_module.c:893:对‘ngx_http_upstream_check_add_dynamic_peer’未定义的引用
objs/addon/src/ngx_http_upsync_module.o:在函数‘ngx_http_upsync_del_peers’中:
/opt/soft/package/nginx-upsync-module/src/ngx_http_upsync_module.c:1126:对‘ngx_http_upstream_check_delete_dynamic_peer’未定义的引用
collect2: 错误:ld 返回 1
make[1]: *** [objs/nginx] 错误 1
make[1]: 离开目录“/opt/soft/package/nginx-1.26.2”
make: *** [build] 错误 2
nginx加载两个模块
# cd /opt/soft/package/
#wget https://nginx.org/download/nginx-1.20.2.tar.gz
#tar xf nginx-1.20.2.tar.gz
#git clone https://github.com/weibocom/nginx-upsync-module.git
#git clone https://github.com/xiaokai-wang/nginx_upstream_check_module.git
#cd nginx-1.20.2
#patch -p1</opt/soft/package/nginx_upstream_check_module/check_1.20.1+.patch
#./configure --prefix=/opt/soft/nginx --sbin-path=/opt/soft/nginx/sbin/nginx --conf-path=/opt/soft/nginx/main-conf/nginx.conf --error-log-path=/opt/log/nginx/error.log --http-log-path=/opt/log/nginx/access.log --pid-path=/opt/soft/nginx/run/nginx.pid --lock-path=/opt/soft/nginx/run/nginx.lock --user=work --group=work --http-client-body-temp-path=/opt/soft/nginx/cache/client_temp --http-proxy-temp-path=/opt/soft/nginx/cache/proxy_temp --http-fastcgi-temp-path=/opt/soft/nginx/cache/fastcgi_temp --http-uwsgi-temp-path=/opt/soft/nginx/cache/uwsgi_tmp --http-scgi-temp-path=/opt/soft/nginx/cache/scgi_temp --with-http_v2_module --with-http_stub_status_module --with-http_ssl_module --with-http_realip_module --with-http_sub_module --with-http_gzip_static_module --with-pcre --with-http_addition_module --with-http_image_filter_module --with-http_dav_module --with-http_flv_module --with-http_mp4_module --with-http_gunzip_module --with-http_gzip_static_module --with-http_gzip_static_module --with-file-aio --add-module=/opt/soft/package/nginx-upsync-module --add-module=/opt/soft/package/nginx_upstream_check_module
#make -j 4
#make install
#/opt/soft/nginx/sbin/nginx -V #可以自行检测一下
#/opt/soft/package/nginx_upstream_check_module/README 可以查看示例
使用探测模块
# cat grafana_pool_upstream.conf
upstream grafana_pool {
   server 127.0.0.1:11111;
   upsync 192.168.1.165:8500/v1/kv/offline/upstream/grafana/ upsync_timeout=5s upsync_interval=1s upsync_type=consul strong_dependency=off;
   upsync_dump_path /data/nginx/conf/grafana_upstream.conf;
   include  /data/nginx/conf/grafana_*.conf;
   #interval:向后端发送的健康检查包的间隔。 rise:如果连续成功次数达到rise_count,服务器就被认为是up。fall:如果连续失败次数达到fall_count,服务器就被认为是down。
   #timeout:后端健康探测请求的超时时间。 type:健康检查包的类型,现在支持以下多种类型:tcp/ssl_hello/http/fastcgi/mysql/ajp
   #缺省配置:如果没有配置参数,默认值是:`interval=30000 fall=5 rise=2 timeout=1000 default_down=true type=tcp`
   check interval=3000 rise=2 fall=5 timeout=2000 type=http;
   #check_http_send:http健康检查包发送的请求内容,该指令可以配置http健康检查包发送的请求内容。为了减少传输数据量,推荐采用"HEAD"方法。
   #当采用长连接进行健康检查时,需在该指令中添加keep-alive请求头,如:"HEAD / HTTP/1.1\r\nConnection: keep-alive\r\n\r\n"。
   #同时,在采用"GET"方法的情况下,请求uri的size不宜过大,确保可以在1个interval内传输完成,否则会被健康检查模块视为后端服务器或网络异常。
   check_http_send "GET /health/defaultcheck HTTP/1.0\r\n\r\n";
   #该指令指定HTTP回复的成功状态,默认认为2XX和3XX的状态是健康的。
   check_http_expect_alive http_2xx http_3xx http_4xx;
}
# /opt/soft/nginx/sbin/nginx #可以看看后端有没有探测URL,然后你再curl一下会发现5xx的后端不会再被访问到了,这个就自己for循环curl验证一下就可以了
#然后你再把http_4xx去掉,就是4xx也认为异常请求,你再curl探测会发现5xx和4xx的后端都不会接收到请求了:
1.4 记录一下curl往consul里面添加key信息
添加操作:
#curl -X PUT http://$consul_ip:$port/v1/kv/upstreams/$upstream_name/$backend_ip:$backend_port
default: weight=1 max_fails=2 fail_timeout=10 down=0 backup=0;
#下面是一个完整的添加例子:
# curl -X PUT -d "{\"weight\":1, \"max_fails\":2, \"fail_timeout\":10}" http://192.168.1.165:8500/v1/kv/offline/upstream/grafana/192.168.1.229:80 #成功得话返回true
# curl -X PUT -d '{"weight":1, "max_fails":2, "fail_timeout":10}' http://192.168.1.165:8500/v1/kv/offline/upstream/grafana/192.168.1.229:80
删除操作:
#curl -X DELETE http://$consul_ip:$port/v1/kv/upstreams/$upstream_name/$backend_ip:$backend_port
#curl -X DELETE http://192.168.1.165:8500/v1/kv/offline/upstream/grafana/192.168.1.229:80
调整权重操作:
#就是添加操作,不存在此key就是创建,存在就是覆盖
关闭服务:
#curl -X PUT -d "{\"weight\":2, \"max_fails\":2, \"fail_timeout\":10, \"down\":1}" http://192.168.1.165:8500/v1/kv/offline/upstream/grafana/192.168.1.229:80
#curl -X PUT -d '{"weight":2, "max_fails":2, "fail_timeout":10, "down":1}' http://192.168.1.165:8500/v1/kv/offline/upstream/grafana/192.168.1.229:80
